samedi 30 mai 2020

Girls just wanna have fun


Ma fille a un groupe d’amies incroyables depuis des années. En ce temps de confinement, elles s’ennuient beaucoup l’une de l’autre. C’est pourquoi j’ai pensé faire une page honorer leur amitié. J’ai trouvé les découpes parfaites pour ce faire avec les Créations Edith Cloutier:
- Découpes mots - Soirée de filles
- Découpes - Collection Isabelle - Fleurs doodling
- Autocollants mini - Amitié


Et ses fleurs ont en plus été dessinées par mon amie Isabelle !!!! Ca me fait réaliser que moi aussi je m'ennuie beaucoup de mes amies !


 J'en ai profité pour participer au défi de More than Words du mois de mai qui demandait de faire une créations avec des lignes et de s'inspirer du mot funny.

A bientôt pour une prochaine création !


mercredi 27 mai 2020

Une belle annonce !


J'ai été choisi pour une seconde année sur la magnifique équipe créative de Heartfelt Creations.  Que j'aime ces produits !!!  Je remercie tous ceux qui ont votés pour moi lors du processus éliminatoire. Bravo à toutes ces dames toutes plus talentueuses les unes que les autres qui formeront l'équipe de 2020 !


Image hébergée par servimg.com

Une cage d'oiseau vieilli

Bonjour !

En ce beau mercredi je vous propose une carte faite avec la collection Cascading Petalset la jolie cage d'oiseau présente dans ce kit. Je l'ai un peu mis à la mode vieillot en lui donnant un effet de patine. J'adore ce look vintage de vert-de-gris et de rouille.


Voici le matériel que j'ai utilisé pour faire cette carte ainsi que les étapes pour la réaliser.

Products Used:
Decorative Cage DieHCD1-7298
Wisteria Petals Cling Stamp SetHCPC-3911
Cascading Petals Paper CollectionHCDP1-2115
Album Tags and Accents DieHCD1-7202
Bright Pearl Stamens-SmallHCS1-458-1
Assorted Pearl Stamens-SmallHCS1-459-1
Deluxe Flower Shaping Paper Pack of 25 - WhiteHCPP1-468
Deluxe Flower Shaping KitHCST1-401
Stack and Store Daubers-Pack of 30HCDA2-450
Cosmic Brown Nuvo MousseNU810
Ranger Archival Ink Pad - SepiaRACP505
Memento Dye Ink Pad - Lilac PosiesTSMP501
Heat It Craft ToolRAHT
Stamp Mat PadD110305
5pc. Acrylic Block SetSUAH05
StazOn Stamp CleanerTSSZSC
Designer Dries White Adhesive159951
Double Dots 100pc. -3D Foam CirclesDDOTS
Scor-Tool, 368771

Other Products: Die cutting machine, cheesecloth, thread, water mister, hot glue gun, hot glue, scissors, Strathmore watercolor paper, Kaisercraft lace cream, natural polish brown hemp, Finnabair effect paste golden nugget, Color bloom prima soft teal/ gold foil, kraft paper, Stickles magenta/Thistle
For more tips on creating with the Cascading Petals Collection watch the tutorial at https://youtu.be/DqhvfrsTI00.
Instructions: Tag size is 6 x 4". From Kraft paper, die cut a tag with the Album Tag and Accents Die using the large tag. Cut a smaller piece in sheet 5A and glue it on your tag base.
Die cut from white cardstock paper 5 decorative cages and glue them together. Die cut one more from a watercolor paper. Color with soft teal and gold foil ink. After that, add gold color with nuvo mousse by using your finger. Also add effect paste golden nugget. Glue over the 5 other ones. Glue on the left of your tag.
Stamp the Cascading flowers with a sepia archival ink and with memento lilac posies ink on white cardstock. Color the petals with the same color. Cut with the coordinating die. Shape the flowers by using the 3D Shaping Mold and give further shape with Deluxe Flower Shaping Kit tools. Add stamens in the centre of the flowers.
Stamp Wisteria Petal in sepia ink and color it. Add pink stickles on the flowers of this stamp. Glue it in the bottom of the cage. Glue flowers over a cheesecloth and brown thremp at the left of the cage and on the wisteria stamp. Cut a sentiment in the 2A sheet and paste it in a kraft cardstock a little bit larger. Glue it on your tag with 3D foam to give dimension.
Add thread, lace and ribbon in the holes of your tags to complete it.
If you want, you can take a 12 x 4” white cardstock and fold it in 2 to have a card. Take you tag die and put the left side of it outside the paper, because you don’t want the left side to be cut. Put it in the die cutting machine and you will have a card the same side of your tag. Then you just have to glue your tag on it to have a beautiful card.


jeudi 21 mai 2020

Une cage d'oiseau comme carte d'anniversaire


Bonjour !

Je vous propose aujourd'hui une carte d'anniversaire faite avec la matrice de découpe en forme de cage d'oiseau de la collection Cascading Petals.  Mes fleurs sont toujours faites à la main et pour celles la j'ai utilisé les produits de la collection Wild Rose.


Products Used:
Cascading Wisteria DieHCD1-7296
Decorative Cage DieHCD1-7298
Cascading Wisteria Cling Stamp SetHCPC-3912
Cascading Petals Paper CollectionHCDP1-2115
Small 3D Wild Rose Shaping MoldHCFB1-486
Small Wild Rose Cling Stamp SetHCPC-3906
Small Wild Rose DieHCD1-7289
Stack and Store Daubers-Pack of 30HCDA2-450
Deluxe Flower Shaping Paper Pack of 25 - WhiteHCPP1-468
Deluxe Flower Shaping KitHCST1-401
Rock Candy Stamens-SmallHCS1-459-4
Ranger Archival Ink Pad - Majestic VioletRACP494
Ranger Archival Ink Pad - Leaf GreenRACP436
3-D Crystal Lacquer 4 oz3D1844
Heat It Craft ToolRAHT
Stamp Mat PadD110305
5pc. Acrylic Block SetSUAH05
StazOn Stamp CleanerTSSZSC

Other Products: Die cutting machine, cheesecloth, Gutermann sewing thread, 28 lilac lane’s sequins, water mister, hot glue gun, hot glue, scissors, stickles thistle and magenta,
For more tips on creating with the Cascading Petals Collection watch the tutorial at https://youtu.be/DqhvfrsTI00.
For more tips on creating with the flower shaping molds, watch the tutorial at https://youtu.be/FSdPL7nXvQE.
Instructions: The finished card measures 5 1/4 inches by 6 inches. Cut a piece of white cardstock 10 1/2 by 6 inches and score at 5 1/4 inches on the width side. Fold to make a side folding card. Cut 1 piece of striped paper from the sheet #7B 5 x 5 3/4 inches and glue it on the base. Cut a piece one green paper (sheet 9B) 4 5/8 x 5 1/4 and add a little violet dotted along the edges. Paste this layer on top of the first one with 3D foam to give dimension.
Die cut in white cardstock paper 5 decorative cages and glue them together. Die cut one more in a violet paper from the sheet #10B. Add 3D lacquer on it. Let it dry and glue it over the 5 others ones. Glue it in the middle of your card.
Stamp the Wild roses flowers with archival majestic violet ink on lilac paper (sheet #8B) (and the leaves with the Fern Green Ink on a white cardstock). Color with the same color with a dauber. Cut with the coordinating die. Shape the flowers by using the 3D Shaping Mold. Add stamens in the center of the flowers.
Die cut cascading Wisteria stamps and add pink stickles on the flowers to give a nice shinny effect.
Put cheesecloth and sewing thread under the leaves. Glue cascading wisteria over and finally add flowers over it. Do it twice. Add one wisteria to the top of the cage and one to the bottom.
Cut a sentiment in your paper. Glue it over your flowers. To add the finish touch, simply add sequins!


vendredi 15 mai 2020

Une belle journée


À chaque mois Les Creations Edith Cloutier nous propose un défi sur sa page facebook.  Ce mois-ci c'est un fabuleux tableau d'inspiration qui guidera nos créations lors de ce défi.  Pour ma part, c'est vers une carte que ce défi a guidé mes pas (ou devrais-je dire mes mains ?)


Pour faire changement, j'ai choisi de faire une carte dont la devanture est coupée en deux. J'ai ainsi pu mettre une rangé de fleurs qui débordent de cette partie et coller mon titre sur le fond blanc de ma carte.


Les produits des Créations Edith Cloutier que j'ai utilisés sont les suivants:
- La planche de découpes Papillons pastels
- La planche de découpes Fleurs Cosmos Aquarelle 2
- Les mots cartonnés Carte No 1


Comme vous pouvez le constater, plusieurs éléments du moodboard m'ont inspirés ! Soit les fleurs, le fond d'écriture manuscrite, la rangée de fleurs dans la boite du camion ainsi que le combo couleur. 

Venez participer en grand nombre afin de courir la chance de gagner de beaux prix !
Image hébergée par servimg.com

mercredi 13 mai 2020

Carte chevalet


Bonjour !

Voici ma première tentative pour faire une carte chevalet.  Ce fut plus compliqué que ce que j'aurais cru mais je suis quand même satisfaite du résultat.  


Voici les produits que j'ai utilisés de même que les étapes de réalisations de cette dernière.

Products Used:
Wisteria Petals DieHCD1-7295
Cascading Wisteria DieHCD1-7296
Wisteria Petals Cling Stamp SetHCPC-3911
Cascading Wisteria Cling Stamp SetHCPC-3912
Cascading Petals Paper CollectionHCDP1-2115
Eyelet Oval DieHCD1-776
Rock Candy Stamens-SmallHCS1-459-4
Pastel Bead Stamens-MediumHCS1-457-3
Celebrate Love Sentiments Cling Stamp SetHCPC-3847
Deluxe Flower Shaping Paper Pack of 25 - WhiteHCPP1-468
Deluxe Flower Shaping KitHCST1-401
Stack and Store Daubers-Pack of 30HCDA2-450
Ranger Archival Ink Pad - Majestic VioletRACP494
Ranger Archival Ink Pad - Leaf GreenRACP436
3-D Crystal Lacquer 4 oz3D1844
Heat It Craft ToolRAHT
Stamp Mat PadD110305
5pc. Acrylic Block SetSUAH05

Other Products: Die cutting machine, cheesecloth, Gutermann sewing thread, 28 lilac lane’s sequins, water mister, hot glue gun, hot glue, scissors, heat gun, stickles purple, funnel tray
For more tips on creating with the Cascading Petals Collection watch the tutorial at https://youtu.be/DqhvfrsTI00.
Instructions: Click here to view another photo of this card. To create this 6" x 6" easel card, start by taking a piece of white card stock 12" x 6". Glue a violet paper inside the card and score at the 6" and 9" marks. Die cut an oval from the Eyelet Oval die in the middle of the top. Cut a 5 1/2 x 5 1/2 lilac paper and glue it in the violet base. Cut a pink paper with the same dimension and die cut a oval with the Eyelet oval, just like the inside top base. Glue it to the first 3 inches x 6 inches card to make the card fold at 3 and 6 inches (but don’t fold the pink paper). Take the pink oval you just made and ink the border with magestic violet. Glue it on the center of the bottom panel. Stamp a sentiment on it from the Celebrate love sentiments set. Next, die cut the Eyelet Oval die out of violet paper (sheet 10 B). (I cut this 5 other times for added strength). Glue it over the 5 others ones. Add 3D lacquer on it. Let it dry. Then glue it over the oval hole.
Stamp the Cascading flowers with archival majestic violet ink on white cardstock (and the leaves with the Fern Green Ink also on a white cardstock). Color with the same color with a dauber. Die cut with the coordinating die. Color the flowers on the other side too. Shape the flowers to make them look like cascading flowers.
Glue 2 vines of leaves on the bottom of the card. Add 4 littles flowers on it. It will give dimension and allow your card to stay upright. Also add vine leaves on the top of the eyelet Oval with more flowers on it.
Cut a sentiment from the paper collection. Glue it over your flowers.
To add the finishing touch, simply add sequins, crystal drops and white wire.


vendredi 8 mai 2020

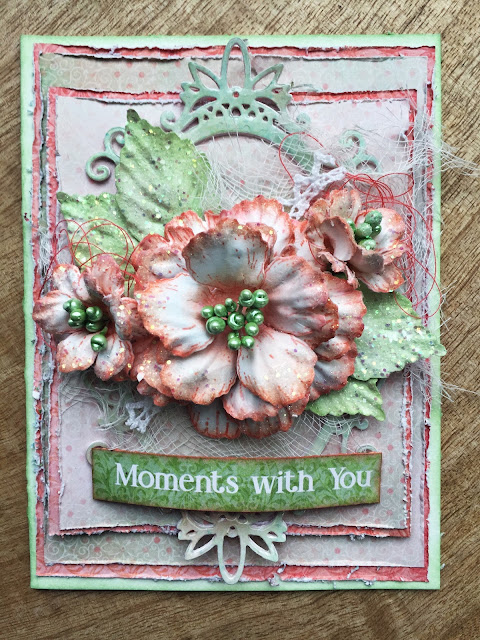
Beautiful moments

Bonjour à vous !

Je vous présente ma création hebdomadaire.  J'ai travaillé ma carte avec des fleurs faites à la main avec la collection Wild Rose. J'ai travaillé  dans les doux tons de pêche et menthe, couleurs que je n'emploi pas nécessairement très souvent. Mais je suis bien contente du résultat, même  si je suis sorti de ma zone de confort pour ce faire !


Products Used:
Royal Elegance Frames DieHCD2-7307
Large 3D Wild Rose Shaping MoldHCFB1-487
Large Wild Rose Cling Stamp SetHCPC-3907
Large Wild Rose DieHCD1-7290
Small 3D Wild Rose Shaping MoldHCFB1-486
Small Wild Rose Cling Stamp SetHCPC-3906
Small Wild Rose DieHCD1-7289
Cherry Blossom Retreat Paper CollectionHCDP1-2100
Pastel Pearl Stamens-MediumHCS1-457-2
Deluxe Flower Shaping Paper Pack of 25 - WhiteHCPP1-468
Stack and Store Daubers-Pack of 30HCDA2-450
3-D Crystal Lacquer 4 oz3D1844
Cheerful Note Sentiments Cling Stamp SetHCPC-3848
Heat It Craft ToolRAHT
Stamp Mat PadD110305
5pc. Acrylic Block SetSUAH05
StazOn Stamp CleanerTSSZSC
Designer Dries Clear Adhesive159723Image hébergée par servimg.com

Other Products: Die cutting machine, cheesecloth, Gutermann sewing thread, water mister, hot glue gun, hot glue, scissors, heatgun, stampin’up crisp cantaloupe and Pistachio pudding, Prima trim lace,
For more ideas on creating with the 5 x 7 Decorative Frame Dies, watch the tutorial at https://youtu.be/qdBFA5VpmSo.
For more tips on creating with the Wild Rose Collection watch the tutorial at https://youtu.be/2ALPhFnT-qI.
For more tips on creating with the flower shaping molds, watch the tutorial at https://youtu.be/FSdPL7nXvQE.
Instructions: The finished card measures 4 1/2 inches by 6 inches. Cut a piece of paper in a white cardstock 9 by 6 inches and score at 4 1/2 inches on the width side. Fold to make a side folding card. Ink the edge with the Pistachio pudding green ink. Cut 1 piece of coral paper 4 1/4 x 5 3/4 inches. Distress the edge with the Spellbinders tool n’ one and glue it on the base. Cut one piece a little bit smaller in the pink paper, distress it and also glue it on the first one. Repeat it 3 3/4 x 4 3/4 in coral and a little bit smaller in pink. Paste these two layers on top of the base card with 3D foam to give dimension.
Die cut in white cardstock 5 decorative diecuts using the Royal Elegance Frames Die and glue them together. Die cut one more in a light green paper. Add 3D lacquer on it. Let it dry and glue it over the 5 others ones. Glue it in the middle of your card.
Stamp the Wild Rose with Crisp cantaloupe ink on white card stock (and the leaf with the pistachio pudding Green Ink). Color it with the same color with a dauber. Cut it with the coordinating die. Shape the flowers by using the 3D Shaping Mold and give further shape with Deluxe Flower Shaping Kit tools. Add stamens in the center of the flowers. Put a little bit of glue on the flowers and the leaves and dip them in the glitter to make them shine.
Put cheesecloth and sewing thread over the die frame in the center of the card and glue your flowers and leaves on it.
Cut a sentiment from your paper. Ink the edge of the sentiment with cantaloupe ink. Glue down to your flowers. To add the finishing touch, simply add trim lace.