Aucun message portant le libellé Classic Rose. Afficher tous les messages

dimanche 24 janvier 2021

Mes amours, ma fierté

Je vous présente ma première page de 2021. Une avec ma belle gang, mes beaux enfants. Une photo prise par une belle journée d'automne sur la plage de notre beau lac Pohénégamook.

Ma page a été réalisée avec les papiers de la collection Floral Shoppe Collection et les fleurs sont faites à la main avec les produits de Wild Rose Collection, Classic rose collection  et Sweet Peony, toujours  de Heartfelt Creations.


Products Used:

Large Floral Urn DieHCD1-7329
Floral Shoppe Accents DieHCD1-7330
Floral Shoppe Fillers DieHCD1-7331
Large Floral Urn Cling Stamp SetHCPC-3931
Floral Shoppe Accents Cling Stamp SetHCPC-3932
Floral Shoppe Fillers Cling Stamp SetHCPC-3933
Floral Shoppe Paper CollectionHCDP1-2122
Small Wild Rose DieHCD1-7289
Small Wild Rose Cling Stamp SetHCPC-3906
Small 3D Wild Rose Shaping MoldHCFB1-486
Small Sweet Peony DieHCD1-7173
Large Sweet Peony DieHCD1-7174
Small Sweet Peony Cling Stamp SetHCPC-3819
Large Sweet Peony Cling Stamp SetHCPC-3820
Classic Rose DieHCD1-7110
Classic Rose Cling Stamp SetHCPC-3752
3D Rose Shaping MoldHCFB1-462
French Cottage 'scapes DieHCD1-7293


Other Products: Die cutting machine Cut’n’boss, heatgun, water mister, hot glue gun, hot glue, scissors, sewing thread, cheesecloth, Rose Moka Lettering, prima micro beads copper, Stampin’pad ink night of navy and dusty Durango, funnel tray

For more tips on creating with the Floral Shoppe Collection watch the tutorial at https://youtu.be/unrqvzpfu1U.

For more tips on creating with the Wild Rose Collection watch the tutorial at https://youtu.be/2ALPhFnT-qI.

For more tips on creating with the flower shaping molds, watch the tutorial at https://youtu.be/FSdPL7nXvQE.

To see how to shape the roses, watch the video at https://youtu.be/Z8P070kC3oo.

To see how to shape the peony, watch the video at https://youtu.be/L9_MLkvpGPQ.

Instructions: The finished layout measure 12 inches by 12 inches. For your background, use the paper #10B. Hand tear a piece of 7 x 12 inch paper (sheet #9B) and glue it in the center. Also hand tear a piece of 4 1/2 x 12inch in the sheet 8B and glue it in the center over the 9B. Cut a 6 x 4 1/2 inch in the 7B sheet and distress the edge with the appropriate tool (or with the blade of a scissors). Give an angle and glue it under your picture. Then glue this in the center of your layout with 3D foam to give dimension. Under the picture, glue a border you already cut in white cardstock with the Sweetheart Borders.

Stamp various elements from the Floral Shoppe Collection and cut with the appropriate dies. I use the ink colors: navy and dusty durango and french ultramarine ink. Make a lot of them to be able to fill your flower bunches just like you want.

Stamp your Wild Rose flowers with French ultramarine ink onto white flower shaping paper, color the centre with dusty Durango ink and shade the edge using blue. Diecut with the coordinating die. Place facedown into the flower shaping mold, spritz with water and run through the diecutting machine to shape. When dry, give further shape with Deluxe flower shaping kit tools. Glue 3 layers together. In the center of the flowers make a hole and add stamens. (I made 2 big flowers 3 smaller ones).

Make flowers from French Cottage Collection . Stamp your flowers with navy blue ink onto deluxe flower shaping paper, color the flowers with the same color. Diecut with the coordinating die. Place facedown, spritz with water and give further shape with Deluxe flower shaping kit tools. Make a hole in the center and add 1 white stamen in the center. Use 2 layers to make one flower. (I made 4 small flowers).

Made 2 flowers with the classic rose kit. Stamp your flowers with rusty durango ink onto white flower shaping paper, color the edge with the same ink. Diecut with the coordinating die. Place facedown into the flower shaping mold, spritz with water and run through the diecutting machine to shape. When dry, give further shape with Deluxe flower shaping kit tools. Put glue in the center of the flowers and add stamens.

Make 3 flowers with the Sweet Peonies kit. Stamp your flowers with french ultramarine ink onto white flower shaping paper, color the edge with the same ink. Diecut with the coordinating die. Place facedown into the flower shaping mold, spritz with water and run through the diecutting machine to shape. When dry, give further shape with Deluxe flower shaping kit tools. Put glue in the center of the flowers and add stamens. (I made 2 big and 1 smaller one).

With a hot glue gun, glue all yours flowers and the element from the Floral Shoppe Collection on each side of your picture. (Put cheesecloth and sewing thread under the flowers before glue them). Add a title with lettering on the opposites corner of the layout.

To add the final touch, add little gold beads all around the flowers.


mardi 24 novembre 2020

Halloween 2019


Bonjour !

Comme vous le savez surement, nous adorons la fête de l'Halloween car elle nous permet de nous déguiser et qu'elle est un incroyable prétexte pour des photoshoot avec les filles. Voici donc une page réalisée avec les photos de mon elf de l'Halloween 2019.


Products Used:
Cascading Petals Paper CollectionHCDP1-2115
Wild Aster DieHCD1-7257
Wild Aster Spray DieHCD1-7258
Wild Aster Cling Stamp SetHCPC-3887
Wild Aster Spray Cling Stamp SetHCPC-3888
3D Rose Shaping MoldHCFB1-462
Classic Rose Cling Stamp SetHCPC-3752
Classic Rose DieHCD1-7110
Deluxe Flower Shaping Paper Pack of 25 - WhiteHCPP1-468
Deluxe Flower Shaping KitHCST1-401
Stack and Store Daubers-Pack of 30HCDA2-450
Ranger Archival Ink Pad - Fern GreenRACP962
Ranger Archival Ink Pad - Jet BlackRACP468
Ranger Archival Ink Pad - Majestic VioletRACP494
Heat It Craft ToolRAHT
Stamp Mat PadD110305
5pc. Acrylic Block SetSUAH05
StazOn Stamp CleanerTSSZSC

ther Products: Die cutting machine Cut’n’boss, heatgun, cheesecloth, water mister, hot glue gun, hot glue, scissors, clear and white gesso, 13 @rts natural mika flakes/violet hologram glitter/black xs microspheres, decoupage glue, rose moka stickers, distress oxide spray wilted violet

For more tips on creating with the Wild Aster Collection watch the tutorial at https://youtu.be/1mriCKqh-Ac.

To see how to shape the roses, watch the video at https://youtu.be/Z8P070kC3oo.

For more tips on creating with the flower shaping molds, watch the tutorial at https://youtu.be/FSdPL7nXvQE.

Instructions: The finished layout measure 12 inches by 12 inches. Take a green paper from the Cascading paper collection for the base of your layout. In another paper from the same collection, cut a piece 6 x 12 inches. Slightly trim the edge of this paper with a tool designed for this purpose or simply the blade of a scissor.

Start by applying a little clear gesso on your sheet to protect it because you want to create a watercolor effect in your background that requires a lot of water. When dry, apply with a brush gorged of water white gesso. You can also add gesso with spatula. With a brush apply distress oxide violet ink and add water to dilute the whole. Do it randomly on your paper. Then make droplets of violet ink and white gesso by shaking a brush gorged with ink over the sheet. Your grunge background is ready.

Make 2 big, 2 medium and 2 small Classic Rose flowers. Stamp using majestic violet ink onto violet paper from the cascading petal collection paper. Colour the reverse of the flowers and diecut with the coordinating die. Place facedown into the flower shaping mold, spritz with water and run through the diecutting machine to shape. When dry, give further shape with Deluxe flower shaping kit tools. For the 2 little ones, poke a hole in the centre of the flowers and add stamens, secure with hot glue.

Make 2 medium and 4 small Wild Aster flowers. Stamp using jet black ink onto white cardstock paper. Colour the flowers and the reverse with the black ink and diecut with the coordinating die. Spritz with water and give further shape with Deluxe flower shaping kit tools. Poke a hole in the centre of the flowers and add violet stamens, secure with hot glue.

With fern green ink, stamp leaves from the Wild aster collection. Also stamp bloom from the same kit. Die cut and color with fern green ink. Give shape with deluxe flower shaping kit. With a spatula, add a touch of white gesso on your flowers and leaves.

Under your 4 x 6” photo glue a sheet of purple paper to which you will have distressed the sides. Glue other pieces of distressed paper on each side. Paste everything on your page with 3D foam to add dimension to your page.

Arrange 3 small bouquets of flowers and leaves and arrange them on a cheesecloth. Paste them on your page by inserting blooms from the Wild Aster collection in the empty spaces. On a small piece of paper, paste letters to make your title (Halloween 2019) and add it on the right corner.

To add a final touch, dip your brush in glue and dip it in mika flakes, violet hologram glitter and black xs microspheres. Put it on your paper all around your flowers.


Image hébergée par servimg.com

jeudi 29 octobre 2020

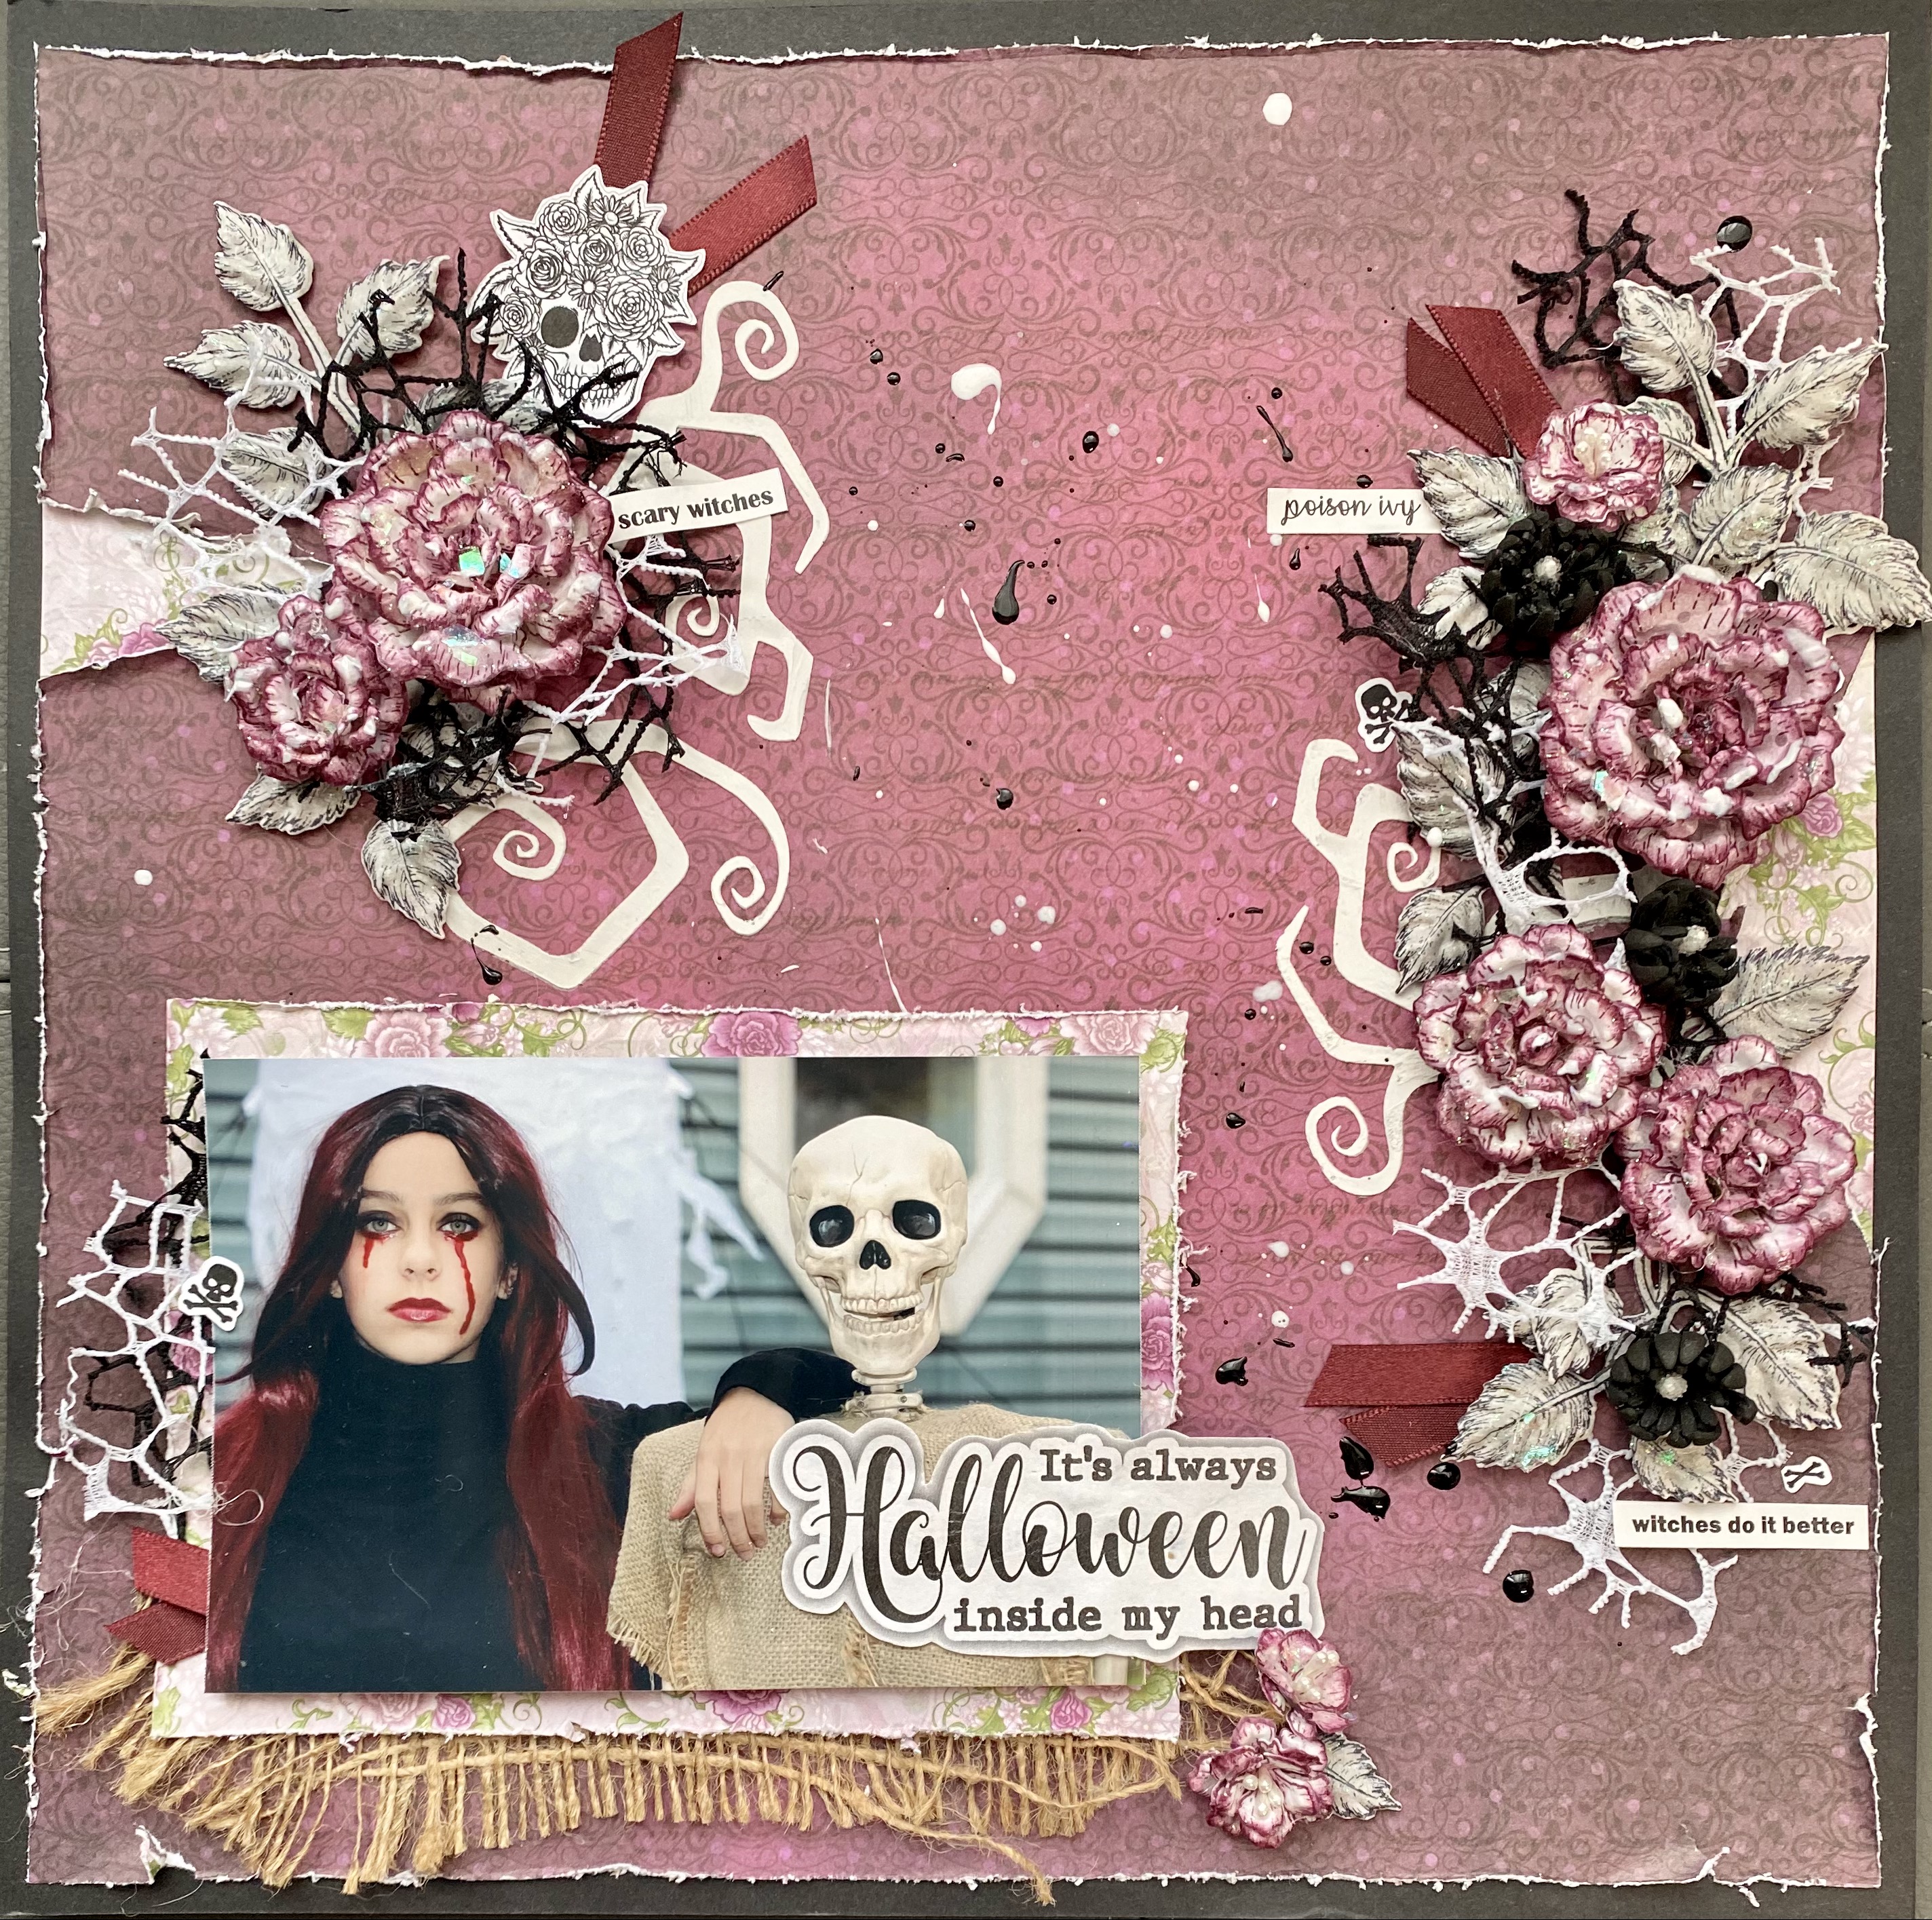
It's always Halloween inside my head !


🌈 CRÉATION DT - VÉRONIQUE 🌈
L'Halloween est à nos portes ! Elle sera surement bien différente cette année, mais rien ne nous empêche de nous refaire des shooting photo sur le thème ! Cela nous permet de faire de bien jolie page, comme celle que je vous présente aujourd'hui !
Pour la réalisée j'ai utilisé les produits des Créations Edith Cloutier suivants:
-Planche Découpes Tête de Mort
-Planche Découpes Mots Cartonnés Halloween
-Autocollants Mini-Halloween

Et toutes les fleurs ont été faites à la main avec les produits de Heartfelt Creations.


Image hébergée par servimg.com

samedi 30 novembre 2019

Roses forever


Les roses sont sans doute mes fleurs préférées chez Heartfelt Creations. Les nouveaux produits qui sont sortis tout juste pour le Boxing Day nous permettent de faire d'incroyables cartes !!! Jumelés avec les roses faites à la main, le rendu est juste trop parfait !  J'adore !!!


Products Used:
Designer Dries White Adhesive159951
Stamp Mat PadD110305
Double Dots 100pc. -3D Foam CirclesDDOTS
6" x 6" Swing Fold Card - WhiteHCCB1-482
Classic Rose DieHCD1-7110
Leafy Accents DieHCD1-7193
Rounded Sunlight Window DieHCD1-7272
Window Scenes Paper CollectionHCDP1-2109
Floral Fashionista Paper CollectionHCDP1-297
3D Rose Shaping MoldHCFB1-462
3D Leafy Accents Shaping MoldHCFB1-467
Luxe Gold CardstockHCGP1-488
Classic Rose Cling Stamp SetHCPC-3752
Leafy Accents Cling Stamp SetHCPC-3835
Deluxe Flower Shaping Paper Pack of 50 - WhiteHCPP1-475
Assorted Pearl Stamens-MediumHCS1-459-2
Ranger Archival Ink Pad - Jet BlackRACP468
Ranger Archival Ink Pad - PlumRACP499


Other Products: Die cutting machine, cheesecloth, Gutermann sewing thread, water mister, hot glue gun, hot glue, scissors, Ice stickles gold, funnel tray
For more tips on creating with the Window Scene cards & dies, watch the tutorial at https://youtu.be/LnM95GR92ao.
To see how to shape the roses, watch the video at https://youtu.be/Z8P070kC3oo.
Instructions: Click here to view more photos of this projectThe finished card measure 6 inches by 6 inches. Choose the HCCB1-482 6" x 6" Swing Fold Card – White for your card base. Cut a round piece of pattern paper from Floral Fashionista Collection with the round die (rounded sunlight window die) and glue it to the card base. Do the same thing on the other side. Ink the border with the Archival ink Plum and a dauber. Choose a square paper in the same color from the Window Scenes Paper Collection and glue it on the card under the round.
With the beautiful Luxe gold cardstock, use die from the Rounded sunlight window die to cut 2 gold windows you will glue in the center of the round.
Stamp Classic Rose with jet black archival ink on a pattern paper from the floral Fashionista paper. Cut it with the coordinating die. Shape the flowers by using the 3D Shaping Mold and give further shape with Deluxe Flower Shaping Kit tools. Add stamens in the center of the little flowers. Add Ice stickles gold on the flowers to make it shine. Also stamp in green paper with archival ink fern green, cut and mold leaves with the leafty accents products.
Put cheesecloth and sewing thread in the right corner of your card and glue your rose and leaves over it.
Cut a sentiment from the paper and glue it to your card with 3D foam to give dimension. Add one flower on your sentiment to add the final touch.


vendredi 22 novembre 2019

Petits animaux sauvages trop cute !

Bonjour !

Pour mon inspiration de la semaine sur Heartfelt Creations je vous propose une petite carte Ave. de petits animaux trop cute !  Toute simple à réaliser avec la nouvelle collection Wilderness Retreat.  Les fleurs sont faites à la main avec les produits de la série Classic Rose que j'adore.


Products Used:
Designer Dries White Adhesive159951
Stamp Mat PadD110305
Double Dots 100pc. -3D Foam CirclesDDOTS
Classic Rose DieHCD1-7110
Floral Fashionista DieHCD1-7215
Create a 'scape Nature DieHCD1-7270
Cut Mat Create 2A DieHCD2-751
Stack and Store Daubers-Pack of 30HCDA2-450
Wilderness Retreat Paper CollectionHCDP1-2108
3D Rose Shaping MoldHCFB1-462
3D Petite Florals Shaping MoldHCFB1-471
Classic Rose Cling Stamp SetHCPC-3752
Floral Fashionista Cling Stamp SetHCPC-3855
Create a 'scape Nature Cling Stamp SetHCPC-3896
Deluxe Flower Shaping Paper Pack of 50 - WhiteHCPP1-475
Assorted Pearl Stamens-SmallHCS1-459-1
Heat It Craft ToolRAHT
5pc. Acrylic Block SetSUAH05

Other Products: Die cutting machine, cheesecloth, Gutermann sewing thread, water mister, hot glue gun, hot glue, scissors, diecutting machine, distress ink Tea dye, Staedtler watercolor pencils
To see how to shape the roses, watch the video at https://youtu.be/Z8P070kC3oo.
Instructions: The finished card measure 6 x 6". Cut the card base in a white card stock to 12 x 6" and score at 6" on the longer side. Fold to make a horizontal folding card. Cut a beige 6 x 6" piece of pattern paper from Wilderness Retreat Collection and glue it to the card base. Glue a piece of 5 x 5" tile paper in the center of the card. Then cut out a piece of white paper 5 1/2 x 5 1/2" and stick over a piece of red paper just a little smaller. Do the same thing with a beige paper (the same as the background) but this time 5 x 5" size. Use from the 2nd largest die from the HCD2-751 Cut Mat Create 2A Die to diecut the center panel from the 2 layers you just made. Then glue it on your base with 3D foam to give dimension.
Stamp the 3 smalls animals from Create a 'scape Nature Cling stamp and color them with the colors of your choice. Cut out with the appropriate dies. Cut out 3 reds squares of 1 1/4 x 1 1/4" and stick on top of it with 3D foam a little smaller white square. Also with foam 3D foam paste your animals on it. Glue everything on the right border of your card.
Stamp the Classic Rose with the Distress Ink Tea dye on white card stock. Color the petals with the same colors by using daubers. Cut it with the coordinate die. Shape the flowers by using the 3D Shaping Mold and give further shape with Deluxe Flower Shaping Kit tools. You can also made 7 little flowers with the Floral Fashionista stamps, die and mold. You just have to use the Archival ink Jet black and stamp it on a red piece of paper from the Wilderness retreat collection. Add stamens in the center of the flowers.
Put sewing thread in the left corner of your card and glue your flower over it (with 3D foam square to give volume). Also add 3 littles flowers on the opposite side of the card.
Cut a sentiment in your paper and glue it in the center of the card.


Image hébergée par servimg.com