jeudi 31 décembre 2020

Floral Shoppe Collection

La dernière collection de Heartfelt Creations est sans contredit une de mes préférées !!!!  Elle est remplie de beau feuillage et d'éléments tout aussi parfait les uns que les autres que nous pouvons utiliser pour remplir à merveille les espaces entre nos fleurs lorsque nous créons un bouquet.  Voyez par vous même grâce à cette création réalisée avec des fleurs de la collection Wild Aster.

J'aime beaucoup rappeler aux gens que tout ici parti d'un simple carton blanc...Etampe, coloriage, découpage, mise en forme et voilà ! (A l'exception des étamines bien sur !)


Products Used:
Large Floral Urn DieHCD1-7329
Floral Shoppe Accents DieHCD1-7330
Floral Shoppe Fillers DieHCD1-7331
Large Floral Urn Cling Stamp SetHCPC-3931
Floral Shoppe Accents Cling Stamp SetHCPC-3932
Floral Shoppe Fillers Cling Stamp SetHCPC-3933
Floral Shoppe Paper CollectionHCDP1-2122
Wild Aster DieHCD1-7257
Wild Aster Cling Stamp SetHCPC-3887
French Cottage 'scapes DieHCD1-7293
French Cottage 'scapes Cling Stamp SetHCPC-3909
Ticket and Tags DieHCD1-7201
Deluxe Flower Shaping Paper Pack of 25 - WhiteHCPP1-468
Deluxe Flower Shaping KitHCST1-401
Stack and Store Daubers-Pack of 30HCDA2-450
Ranger Archival Ink Pad - Fern GreenRACP962
Ranger Archival Ink Pad - Red GeraniumRACP993
Ranger Archival Ink Pad - SunflowerRACP005

Other Products: Die cutting machine Cut’n’boss, heatgun, water mister, hot glue gun, hot glue, scissors, nuvo embellishment mousse seaspray green, stampin’ write basic grey, smoky slate, basic black, watercolor paper, funnel tray

For more tips on creating with the Floral Shoppe Collection watch the tutorial at https://youtu.be/unrqvzpfu1U.

For more tips on creating with the Wild Aster Collection watch the tutorial at https://youtu.be/1mriCKqh-Ac.

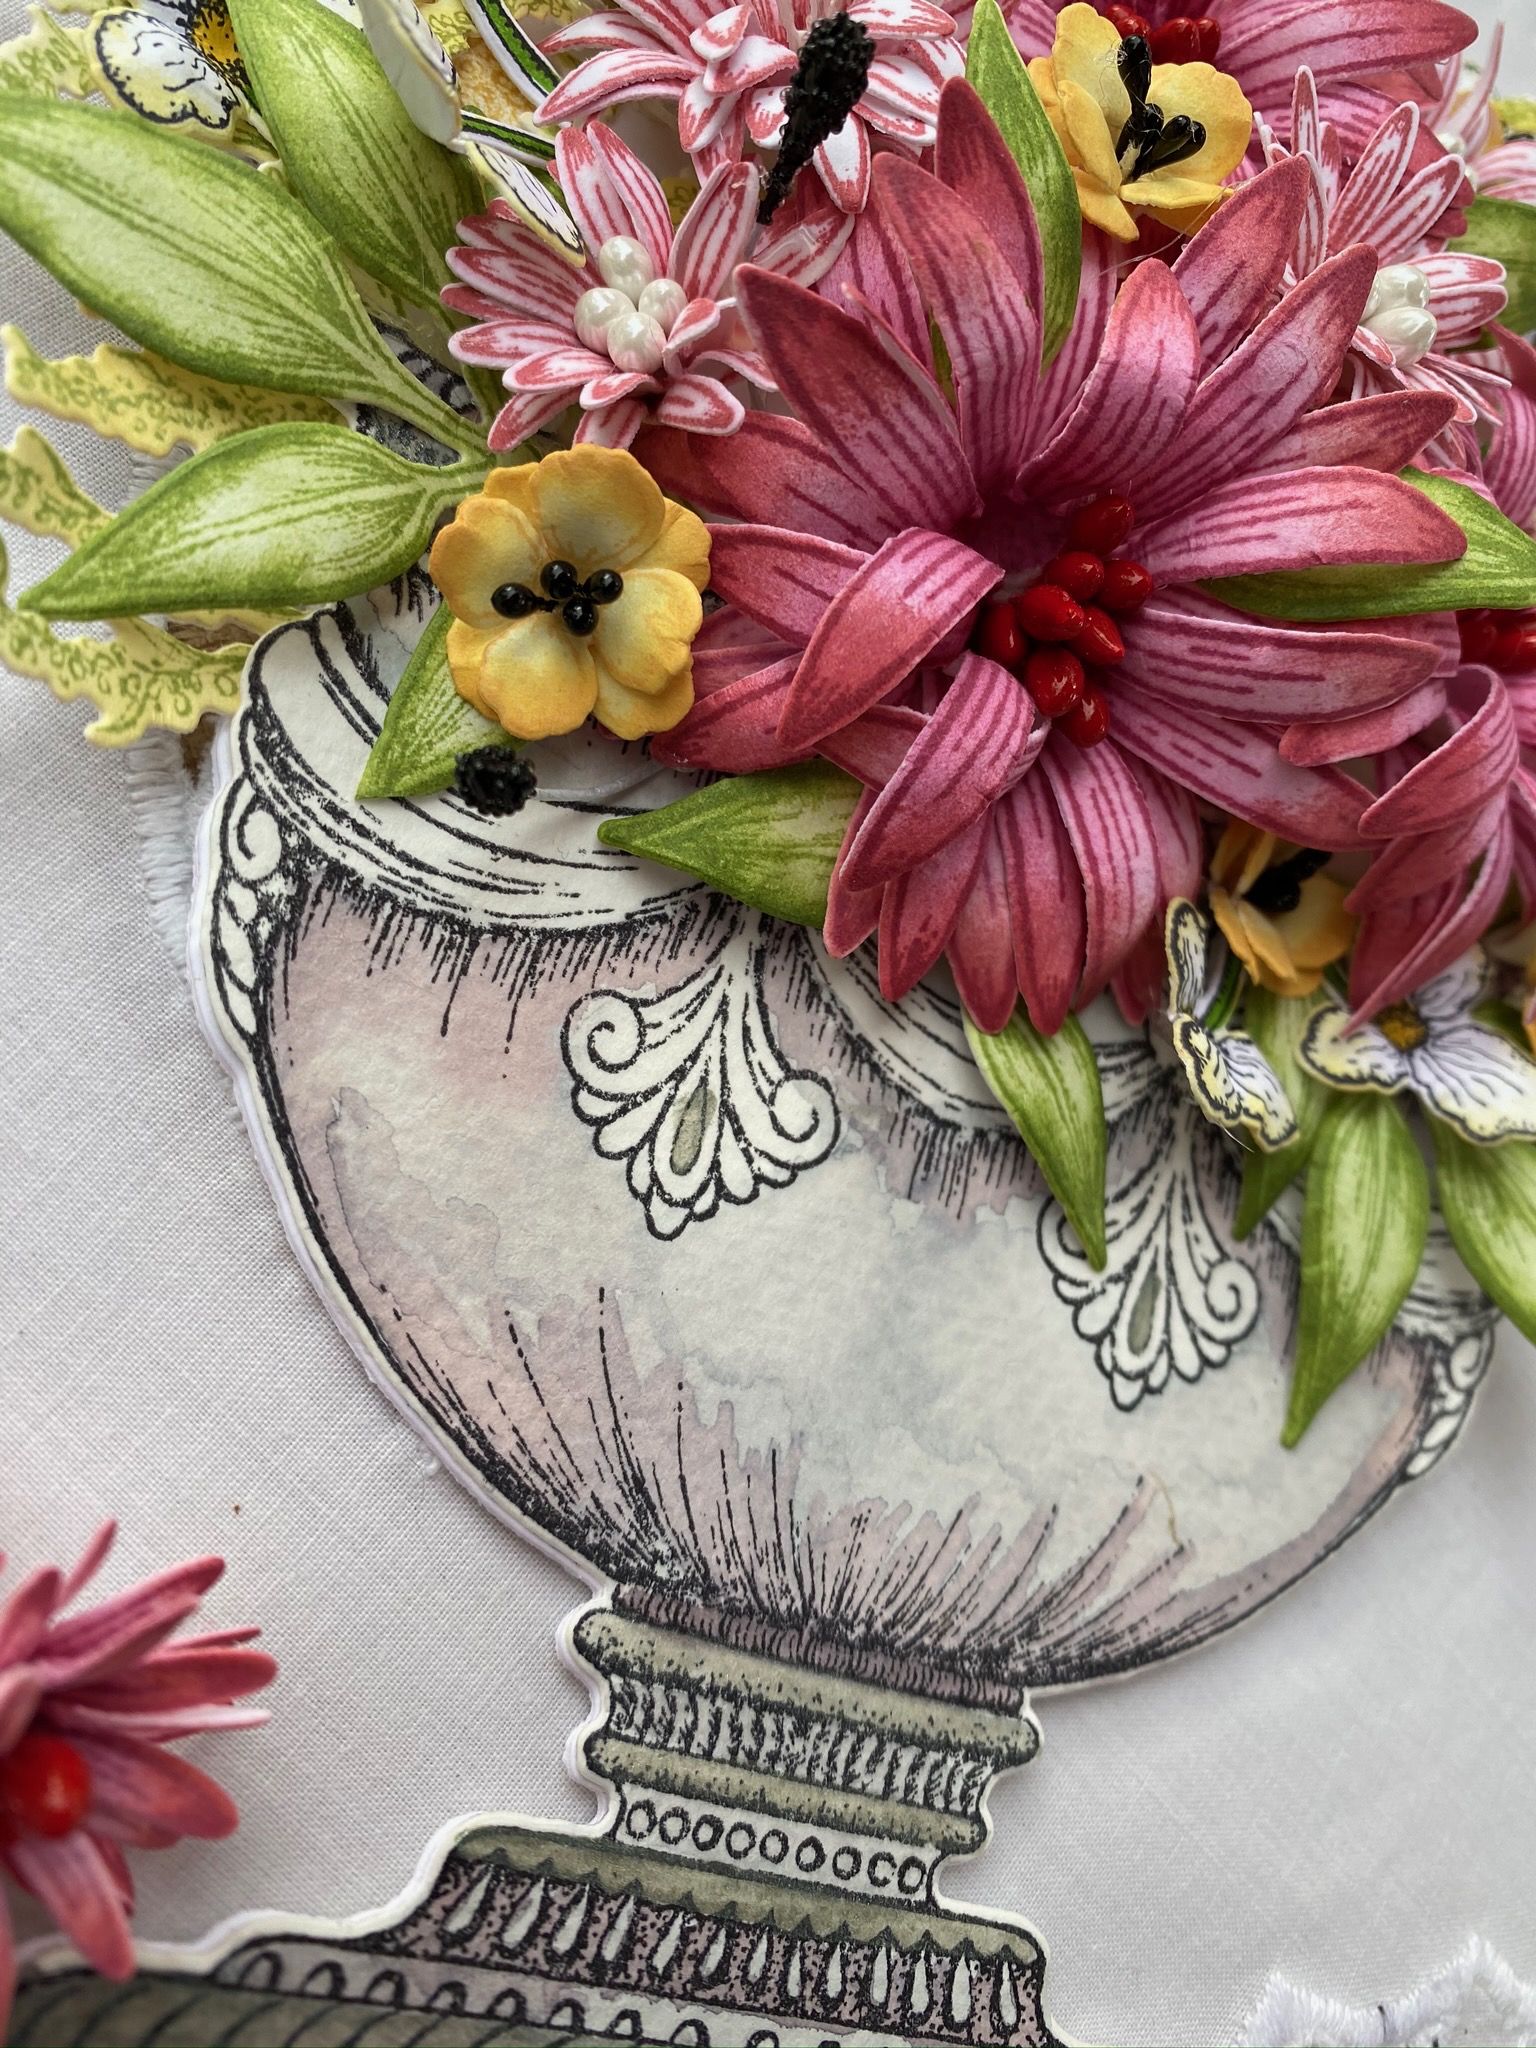
Instructions: The finished card measures 6 x 8”, including the flowers. Stamp Urn on watercolor paper with Jet black ink, die cut and color with grey markers. Add a touch of glitter with grey nuvo embellishment mousse. Cut a piece of white cardstock 4 1/2 x 12” and fold it at 6’’ to make a shaped card base. Let the top of the die fall above the cardboard to avoid cutting the top. Glue stamped urn to the top of shaped card leaving the top open.

Than stamp various elements from the Floral Shoppe Collection in leaf green ink and cut it with the appropriate die. Color it with yellow and green ink. Make a lots of them to be able to fill the urn just like you want.

Made flowers from Wild aster Collection. Stamp your flowers with red geranium ink onto deluxe flower shaping paper, color the flowers with the same color for the biggest ones and leave some of them white on the inside. Diecut with the coordinating die. Place facedown, spritz with water and give further shape with Deluxe flower shaping kit tools. Make a hole in the center and add stamens. Use 3 layers to make one flower. (I made 3 large red flowers plus 5 smaller white.)

Made flowers from French Cottage Collection. Stamp your flowers with sunflower ink onto deluxe flower shaping paper, color the flower with the same color. Diecut with the coordinating die. Place facedown, spritz with water and give further shape with Deluxe flower shaping kit tools. Make a hole in the center and add black stamens. Use 2 layers to make one flower. (I made 6 small flowers.)

With a hot glue gun start gluing your flowers on the top of the Urn. Then fill the Urn with all the elements you already diecut from the Floral Shoppe Collection. To make you bouquet, simply use the “use-error” method, and when you like it, simply glue it. Die a sentiment in paper #4B with a tag die. Add your sentiment to the left of the urn. To add the finishing touch, simply add black stamens through your bouquet!


dimanche 27 décembre 2020

Moment magique


Qui a dit que des découpes ne pouvaient pas donner de la dimension à une création ? Personne assurément ! Car il suffit d’une simple petite rotation de stylet sur nos images (préalablement déposées sur un tapis de foam) pour que les découpes de papier se retrouvent avec de la dimension ! Ce qui agrémente de jolie façon toutes nos créations !

Pour cette carte aux allures de couronne de Noël j’ai utilisé les planches Feuillages dorés et Mots Cartonnés Le temps des fêtes.Image hébergée par servimg.com


mardi 22 décembre 2020

Mon beau sapin


🎄 DÉFI #4 DES CRÉATIONS EDITH CLOUTIER 🎄
Comme défi en ce temps des fêtes je vous propose de rendre hommage au majestueux Roi des Forêts qu'est le Sapin !
👉 Je vous demande donc de mettre sur votre création un sapin ou des branches de sapin. (Cela peut prendre différents aspects: un triangle de papier, un dessin à la main, un stencil de sapin, des découpes, etc).
Pour ma part j'ai utilisé les sapins de la planche de découpes "Forêts". Mon titre vient de la planche "Le temps des fêtes". N'oubliez pas d'inclure un produit des Créations Edith Cloutier sur votre création afin que votre défi soit valide !


mardi 8 décembre 2020

Merry Christmas Cardinal


Les matrice de découpe de Heartfelt Creations du boxing day sont des plus polyvalentes.  J'ai fabriqué une jolie carte de Noel avec ces dernières.


Products Used:
Scalloped Flourish Gateway DieHCD2-7325
Ornate Flourish Gateway DieHCD2-7326
5" x 7" Gateway Fold Card - WhiteHCCB1-495
Festive Pine Cones DieHCD1-7302
Festive Pine Cones Cling Stamp SetHCPC-3917
Snowy Pine Cardinals DieHCD1-7303
Snowy Pine Cardinals Cling Stamp SetHCPC-3918
Snowy Pines Paper CollectionHCDP1-2117
Christmas Poinsettia & Holly DieHCD1-7249
Christmas Poinsettia & Holly Cling Stamp SetHCPC-3881
3D Christmas Poinsettia Shaping MoldHCFB1-478
Assorted Pearl Stamens-SmallHCS1-459-1
Assorted Bead Stamens-MediumHCS1-459-3
Deluxe Flower Shaping Paper Pack of 25 - WhiteHCPP1-468
Deluxe Flower Shaping KitHCST1-401
Stack and Store Daubers-Pack of 30HCDA2-450
Zig Clean Color Real Brush Markers - 48 Pack478594
Rajni Chawla's Crystal ClearPGM15015
Hydra Sponges, RLHS100


Other Products: Die cutting machine Cut’n’boss, heat gun, water mister, hot glue gun, hot glue, scissors, Ice stickles Christmas red and diamond, sewing thread, cheesecloth, funnel tray

For more ideas on creating with the Elegant Gateway Dies and Accents, watch the tutorial at https://youtu.be/H6fZTiYUH_w.

For more tips on creating with the Snowy Pines Collection watch the tutorial at https://youtu.be/nVtKVcgg530.

For more tips on creating with the Candlelit Christmas collection, watch the tutorial at https://youtu.be/PJeFD_d3AiM.

Instructions: The finished card measure 5 x 7". For the base of your card, choose a 5x7" Gateway Fold Card - White With the Scalloped Flourish Gateway die, cut 2 pieces of paper with the biggest die from the sheet #8B, ink the edge of all the paper with the red geranium ink and a dauber. Glue it on the first and on the third card base. From the same kit cut with the second larger die in the paper #6B. Also ink the edge in red and glue in on the first base. Use Ornate florish gateway die to cut in a white cardstock the center of the card and glue it on the first base.

For the second panel, cut a paper from the 6A paper, cut the edge with the Ornate florish gateway die, ink the edge in red and glue it on the base. For the third base make a pocket with a 4 3/4 x 3 1/2” paper (ink the edge). Add a white border made with the second die from the Scalloped flourish gateway die.

Make Poinsettias from the Candlelit Christmas Collection. Stamp your flowers with red geranium ink onto white flower shaping paper, color the centre with red ink. Color the reverse of the flowers and diecut with the coordinating die. Place facedown into the flower shaping mold, spritz with water and run through the diecutting machine to shape. When dry, give further shape with Deluxe flower shaping kit tools. Put glue in the center of the flowers and add red stamens. (I used 3 larges petals to make a flower and only two for the smaller). With a sponge, add glue on your petals and put crystal clear glitter on them. Make your holly leaves with the same method by using the fern green ink.

Cut 2 sentiments from your paper. Glue one on the first panel and one on the third with 3D foam to give dimension. Put cheesecloth and sewing threat over your sentiments and glue flowers on leaves over it. Add big stamens to fill the space. Add glitter on your card to give a snow effect.

To add the finishing touch, stamp a cardinal, color with zig markers, diecut and add it to the front of your card! Do the same thing with pinecones branch and add it on your bouquet !


Image hébergée par servimg.com

lundi 7 décembre 2020

Beautifall !


🌈 CRÉATION DT - VÉRONIQUE 🌈
Bien que l'hiver frappe à nos portes, nous sommes encore bel et bien l'automne (et puisque c'est ma saison préférée, j'aime bien l'étirer un petit peu...). Je vous présente donc une carte aux allures automnales avec des feuilles prises parmi les produits des Créations Edith Cloutier.

J'ai utilisé les planches de découpes suivantes: Légende d'automne, Feuilles d'automne, Feuillage 3, Feuilles d'automnes (mini). Le titre pour sa part vient de la planche Légende d'automne.


Et, vous, utiliserez-vous un peu de feuillage pour nous faire voir les derniers jours d'automne ?


Image hébergée par servimg.com

vendredi 27 novembre 2020

Création du Black Friday !

C'est le Black Friday !

A chaque Black Friday, Heartfelt Creations nous propose un produit super intéressant.  Celui de cette année l'est encore une fois !  Ce sont des découpes afin de nous permettre de fabriquer de superbes et élégantes cartes !

Je vous en propose une aujourd'hui !  Profitez bien de cette journée pour vous procurer ces produits à bon prix !


Products Used:
Scalloped Flourish Gateway DieHCD2-7325
Elegant Swirl Gateway DieHCD2-7327
Elegant Gateway Sentiments Cling Stamp SetHCPC-3930
5" x 7" Gateway Fold Card - White (ETA: December 14th)HCCB1-495
Dazzling Dahlia Paper CollectionHCDP1-2121
Small Wild Rose DieHCD1-7289
Large Wild Rose DieHCD1-7290
Small Wild Rose Cling Stamp SetHCPC-3906
Large Wild Rose Cling Stamp SetHCPC-3907
Small 3D Wild Rose Shaping MoldHCFB1-486
Large 3D Wild Rose Shaping MoldHCFB1-487
Rose Hip Stamens - LargeHCS1-490
French Cottage 'scapes DieHCD1-7293
French Cottage 'scapes Cling Stamp SetHCPC-3909
Rock Candy Stamens-SmallHCS1-459-4
Assorted Pearl Stamens-SmallHCS1-459-1
Deluxe Flower Shaping Paper Pack of 25 - WhiteHCPP1-468
Deluxe Flower Shaping KitHCST1-401
Hydra Sponges, RLHS100Image hébergée par servimg.com

Other Products: Die cutting machine Cut’n’boss, heatgun, water mister, hot glue gun, hot glue, scissors, watercolor pencil

For more ideas on creating with the Elegant Gateway Dies and Accents, watch the tutorial at https://youtu.be/H6fZTiYUH_w.

For more tips on creating with the flower shaping molds, watch the tutorial at https://youtu.be/FSdPL7nXvQE.

For more tips on creating with the Wild Rose Collection watch the tutorial at https://youtu.be/2ALPhFnT-qI.

Instructions: The finished card measures 5 x 7". For the base of your card choose a 5 x 7" Gateway Fold Card – White. With the Scalloped Florish Gateway die cut 3 pieces of paper with the biggest die from the sheet #3B, ink the edges of all the papers with the Coastal Coral ink and a dauber. Glue on the card base.

Cut 3 swirls from the Elegant Swirl Gateway die (the second largest) from white cardstock and glue in on the 3 bases of the card. With the same die kit, cut 2 pieces with the third larger die (one in sheet #9B and one in sheet #3B). Glue the border on the front base and on the last base. On the center of this diecut paper, glue a white diecut paper from the smaller part of the die kit. Glue this with 3D foam on the front and on the last base.

Make flowers from the Wild Rose Collection. Stamp your flowers with coral ink onto white flower shaping paper, color the centre with yellow ink and shade the rest of the flower using coral. Color the reverse of the flowers and diecut with the coordinating die. Place facedown into the flower shaping mold, spritz with water and run through the diecutting machine to shape. When dry, give further shape with Deluxe flower shaping kit tools. Put glue in the center of the flowers and add rock candy stamens and rose hip stamen dipped in the crystal powder. (I used 3 larges petals to make a flower). I also do one smaller with yellow ink and coral ink in the center.

Make tiny flowers with the same color by using the French Cottage Collection and white stamens. Also make leaves from both flower collections and use the leaf green ink. Glue your flowers on the front of the card and add leaves to fill the empty space. Also add tiny ones on the last page of the card.

Stamp your sentiment in the middle page with coral color ink. To add the finishing touch, simply add colors with watercolor pencil!