Aucun message portant le libellé Sea breeze Collection. Afficher tous les messages

mercredi 6 novembre 2019

Un petit tag marin !

C'est le moment de vous présenter l'inspiration du mercredi de Heartfelt Creations !  Cette semaine je vous propose un petit tag aux allures marines.  Pour se faire j'ai principalement utilisé la collection de papier et d'étampe de la collection Sea Breeze.  Les fleurs elles sont pour leur part faites à la main avec les produits de la série oakberry Lane.  J'aime vraiment beaucoup ces fleurs qui sont très versatiles et se prêtent à beaucoup de style différents !


J'ai pris soin de rajouter de la jute, des racines de bois, du papier kraft ondulé, de la dentelle afin de donner un look ou les matières premières sont à l'honneur.


Voici maintenant les produits que j'ai utilisés ainsi que les étapes de créations de mon tag.


Other Products: Die cutting machine, cheesecloth, thread, water mister, hot glue gun, hot glue, scissors, Prima lace, seashell, ribbon, watercolor pencils staedtler, 13 arts roots, distress ink walnut stain, Strathmore watercolor paper, Funnel Tray
For more tips on creating with the Sea Breeze Collection watch the tutorial at https://youtu.be/FEQMFvu880o.
For more tips on creating with the Oakberry Lane collection, watch the tutorial at https://youtu.be/HirfUN8NEYY.
Instructions: Tag size is 6 x 4". From the Sea Breeze paper Collection, die cut a tag with the Album Tag and Accents Die using the large tag (in a blue paper). Ink the edges with maganese blue ink. Cut a smaller piece of corrugated paperand glue on your tag base with 3D foam to give dimension.
Stamp a rope frame from the A day at sea stamp set on white cardstock paper and color it with pencil or markers. Die cut with the appropriate die. Stamp a boat on watercolor paper and color it with watercolor pencil. Glue the rope frame over it and glue it over the corrugated paper.
Stamp the Oakberry lane blossoms flowers with a blue archival ink on white card stock. Color the petals with the same color. Cut it with the coordinating die. Shape the flowers by using the 3D Shaping Mold and give further shape with Deluxe Flower Shaping Kit tools. Add stamens in the centre of the flowers.
Put a ribbon, roots and thread in the left corner of your tag and glue 3 flowers over it.
Cut 1 tag from the paper collection and add it to your layout. You can also cut two other ones in a beige paper (ink the edge with walnut stain ink) and a small one in a blue a blue paper and glue it under the currugated paper. Add thread, lace and ribbon in the holes of your tags to complete it.
If you want, you can take a 12 x 4” white cardstock and fold it in 2 to have a card. Take you tag die and put the left side of it outside the paper, because you don’t want the left side to be cut. Put it in the die cutting machine and you will have a card the same size as your tag. Then you just have to glue your tag on it to have a beautiful card.


mercredi 30 octobre 2019

Love

En ce mercredi frisquet, laissez-moi vous présenter une carte toute simple réalisée avec les produits de Heartfelt Creations.  J'ai utilisé un modèle de carte pré-découpée, avec les papiers de la collection Sea Breeze et les fleurs faites main avec les produits de la collection Oakberry lane.


Voici plus en détail les produits et les instructions de ma carte !

Products Used:
Designer Dries White Adhesive159951
Scor-Pal Measuring & Scoring Board173842
Spellbinders Tool N' One359848
Scor-Tool368771
Stamp Mat PadD110305
Double Dots 100pc. -3D Foam CirclesDDOTS
4 1/4" x 5 1/2" Foldout Cards-WhiteHCCF1-443-2
Fleur Border Basics DieHCD1-7120
Oakberry Lane Blossoms DieHCD1-7200
Stack and Store Daubers-Pack of 30HCDA2-450
Sea Breeze Paper CollectionHCDP1-2107
3D Blossoms Shaping MoldHCFB1-469
Oakberry Lane Blossoms Cling Stamp SetHCPC-3842
Deluxe Flower Shaping Paper Pack of 50 - WhiteHCPP1-475
Bridal Bouquet Stamens-SmallHCS1-460
Deluxe Flower Shaping KitHCST1-401
Ranger Archival Ink Pad - Paradise TealRACP500
Heat It Craft ToolRAHT

Other Products: Versamark Stamp pad, Embossing powder WOW! Opaque Bright White, chipboard, Die cutting machine, cheesecloth, Gutermann sewing thread, water mister, hot glue gun, hot glue, scissors, stampin’pad Tangerine tango
For more tips on creating with the border dies & foldout cards, watch the tutorial at https://youtu.be/wxX94X84kUo.
For more tips on creating with the flower shaping molds, watch the tutorial at https://youtu.be/FSdPL7nXvQE.
Instructions: Click here to view more photos of this project. For the base of your card, use the 4 x 5 1/2 Foldout card (white). Prepare your fold out card base as instructed on Emma Lou's video using the Sea Breeze Collection paper (teal and orange papers). After, layering it with the border dies (see video) from the Fleur Border Basics craft dies.
Stamp the Oakberry Lane Blossoms flowers with archival Paradise Teal ink on white card stock. Color with the ink.  Cut it with the coordinate die. Shape the flowers by using the 3D blossoms shaping mold and give further shape with Deluxe Flower Shaping Kit tools. Add stamens in the center of the flowers. Also stamp leaves with the orange, cut and mold.
Put cheesecloth and sewing thread in the left corner of your card and glue your flower over it (with 3D foam square to give volume). Also add flower on the opposite side of the card. Emboss in white a chipboard for your title. Glue it under the flowers at the left. To add the finish touch, simply add sequins.


Image hébergée par servimg.com

mercredi 23 octobre 2019

As free as the ocean

 Bonjour !

Chaque mercredi je vous présente une nouvelle cr.étion faite à partir des produits de Heartfelt Creations, compagnie dont  je suis membre de l'équipe créative.

Ce qui me plaît le plus dans leurs produits ce sont les nombreux kit que nous pouvons utiliser pour faire des fleurs en papier à la main.  Aujourd'hui sur cette page j'ai utilisé les fleurs du kit Purr-fect Posies.  Des fleurs pas trop grosses et juste assez délicates qui viennent embellir ma page.


Vous trouverez ici les liens pour les différents produits utilisés de même que les instructions en anglais pour réaliser ma page.

Deluxe Flower Shaping Kit, HCST1-401Image hébergée par servimg.com

Other Products: Versamark Stamp pad, Embossing powder WoW! Opaque Bright White, Liquitex modeling paste, Cuts2luv’s flair, Clear Gesso, White Gesso, Creative embellishments’s chipboard, Die cutting machine, cheesecloth, Gutermann sewing thread, water mister, hot glue gun, hot glue, scissors, Spray Heidi swap teal, spray dylusion lemon zest, Spray Adirondack stream, stickers Les Creations Edith Cloutier, Funnel Tray
For more tips on creating with the Purr-fect Posies collection, watch the tutorial at https://youtu.be/88KR6a5RRmg.
For more tips on creating with the flower shaping molds, watch the tutorial at https://youtu.be/FSdPL7nXvQE.
Instructions: Click here to view a larger photo of this project. Take a turquoise 12 x 12” sheet from the Sea Breeze Collection and cut it to 4 inches. You can lightly trim the edge of these with a tool designed for this purpose or simply the blade of a scissor. Glue the 4 x 12” paper on another 12x 12 sheet, yellow this time. Start by applying a little clear gesso on your sheet to protect it because you want to work on your background with ink. Make droplets of turquoise and yellow ink by shaking a brush gorged with ink over the sheet. Do the same thing with white gesso. Take the stamp from the Elements of home set, and stamp randomly little parts of flowers on your background with teal and yellow ink. Use a stencil and modeling paste to make little flowers on your paper. Your background is ready. 
Stamp the Purr-fect Posies flowers with versamark stamp pad on white card stock. Emboss with the white powder and color with the yellow and Persian green Zig pen. Cut with the coordinate die. Shape the flowers by using the 3D purr-fect posies Shaping Mold and give further shape with Deluxe Flower Shaping Kit tools.  Add stamens in the center of the flowers. 
Die cut a paper lace in a white cardstock with the die from the album tag and accents and glue in between the 2 layers of your papers. In the center of your layout, put a cheesecloth. Over it, add yellow and turquoise sewing thread. Paint a chipboard with white paint and then color it with Persian turquoise zig pen.  Place this chipboard over the cheesecloth. Put your picture over the chipboard. Arrange the flowers on each side of your picture by using clear glue. 
At the bottom of the chipboard, also add 3 littles flowers. Add a flair through your flowers for the final touch.  


mercredi 16 octobre 2019

Sea breeze Rose


Bonjour !

En ce beau mercredi d'automne je vous présente une carte que j'ai réalisé à partir de la collection Sea Breeze de Heartfelt Creations.

C'est une collection ayant pour thème la mer, mais je l'ai utilisé tout autrement !  J'ai fait une jolie fleur à la main avec les produits de la série Classic Roses.  C'est vraiment mon kit de fleurs préféré !


Voici la liste des produits que j'ai utilisés ainsi que les démarches pour reproduire ma carte.

Products Used:
Designer Dries White Adhesive159951
Scor-Pal Measuring & Scoring Board173842
Spellbinders Tool N' One359848
Scor-Tool368771
Stamp Mat PadD110305
Double Dots 100pc. -3D Foam CirclesDDOTS
Classic Rose DieHCD1-7110
Fleur Border Basics DieHCD1-7120
Butterfly Kisses Decorative DieHCD1-7179
Leafy Accents DieHCD1-7193
Ticket and Tags DieHCD1-7201
Stack and Store Daubers-Pack of 30HCDA2-450
Sea Breeze Paper CollectionHCDP1-2107
3D Rose Shaping MoldHCFB1-462
3D Leafy Accents Shaping MoldHCFB1-467
Classic Rose Cling Stamp SetHCPC-3752
Leafy Accents Cling Stamp SetHCPC-3835
Deluxe Flower Shaping Paper Pack of 25 - WhiteHCPP1-468

Other Products: Die cutting machine, cheesecloth, Gutermann sewing thread, water mister, hot glue gun, hot glue, scissors, sequins, ribbon, script stamp, Stampin’pad Pumpkin pie, Trim frosted lace Prima, glossy accent Ranger, funnel tray
To see how to shape the roses, watch the video at https://youtu.be/Z8P070kC3oo.
Instructions: The finished card measures 4 1/2 inches by 6 1/2 inches. Cut the card base in white card stock to 9 inches by 6 1/2 inches and score at 4 1/2 inches on the longer side. Fold to make a horizontal top folding card. Cut a 4 1/4 x 6 1/4 inch piece of orange pattern paper from Sea Breeze Collection and glue it to the card base. Cut another pattern paper (turquoise this time) a little bit smaller than the first mat layer and adhere to it. (Before pasting the second paper, you can lightly distress the edge of these with a tool designed for this purpose or simply the blade of a scissor.)
Cut a border with the Fleur Border die in white cardstock.  Glue a part of this border on the right side of your card and another part on the left side (between the paper’s layers). Use the Ticket and die to make a beautiful tag.  Put a ribbon on it and glue it on your card with 3D foam to give dimension. You can randomly apply writing stamp everywhere on the card with the orange ink.
Stamp on a white cardstock a big and a small Classic Rose with the Stampin’pad pumpkin pie. Color the petals with a dauber and the same color. Cut it with the coordinating die. Shape the flowers by using the 3D Shaping Mold and give further shape with Deluxe Flower Shaping Kit tools. Also, stamp, color, cut and mold leaves (use the Archival ink paradise steal). You can put a little bit of glossy accent on the rose to give light to it.

Put cheesecloth and sewing thread on the tag and glue your flower and leaves over it. Under the flower, you can add lace. With the Butterfly kisses die cut the word Thank you and a circle to make the sentiment. You can highlight your circle with orange ink and a dauber. Glue this sentiment on your card with 3D foam.  


Image hébergée par servimg.com

mercredi 9 octobre 2019

Beach Beauty

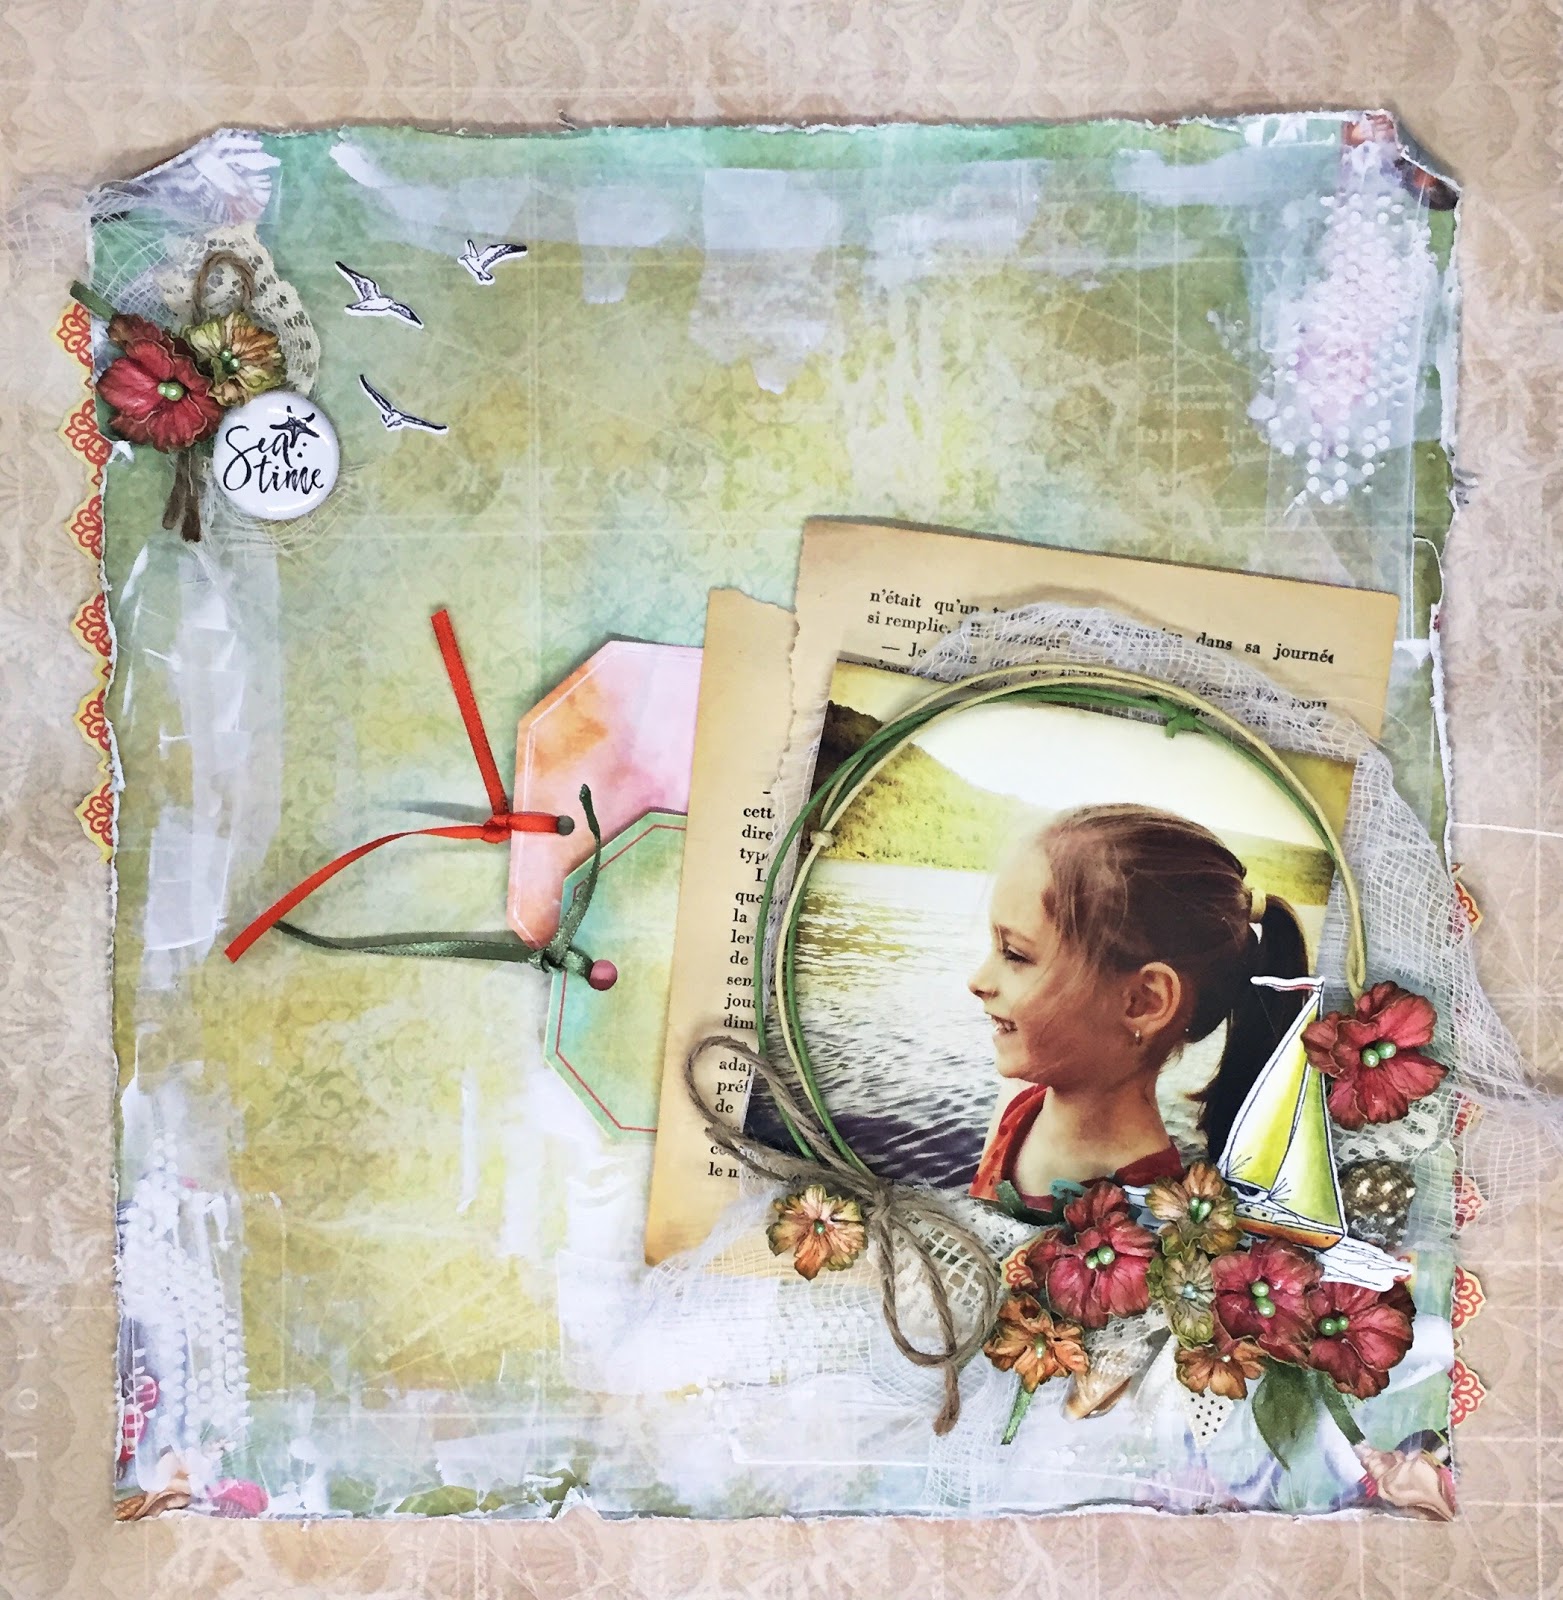
Aujourd'hui c'est la présentation de ma premiere création faite avec la Collection Sea Breeze de Heartfelt Creations.  Une belle collection qui nous rappelle la mer et les cours d'eau.  Puisque j'habite au bord d'un lac, ce n'est pas les photos de plage qui me manque !

Il y a toujours un badge de la compagnie  Cuts2luv pour aller avec chacune de mes créations !


J'ai agrémenté le tout de fleurs faites à la main issues de la collection Oakberry Lane.


Voici la liste des produits utilisés ainsi que les étapes (en anglais) de ma création.

Products Used:
Designer Dries White Adhesive159951
Scor-Pal Measuring & Scoring Board173842
Spellbinders Tool N' One359848
Scor-Tool368771
Stamp Mat PadD110305
Double Dots 100pc. -3D Foam CirclesDDOTS
Oakberry Lane Blossoms DieHCD1-7200
Ticket and Tags DieHCD1-7201
Sand and Sunsets DieHCD1-7265
A Day at Sea DieHCD1-7266
Stack and Store Daubers-Pack of 30HCDA2-450
Sea Breeze Paper CollectionHCDP1-2107
3D Blossoms Shaping MoldHCFB1-469
Oakberry Lane Blossoms Cling Stamp SetHCPC-3842
Sand and Sunsets Cling Stamp SetHCPC-3891
A Day at Sea Cling Stamp SetHCPC-3892
Deluxe Flower Shaping Paper Pack of 50 - WhiteHCPP1-475
Deluxe Flower Shaping KitHCST1-401
Image hébergée par servimg.com

Other Products: Die cutting machine, cheesecloth, Gutermann sewing thread, water mister, hot glue gun, hot glue, scissors, Crafter’s workshop stencil, modeling paste, flair Cuts2luv, Prima lace, old book sheet, seashell, ribbon, watercolor pencils staedtler, funnel tray.
For more tips on creating with the Sea Breeze Collection watch the tutorial at https://youtu.be/FEQMFvu880o.
Instructions: Click here to view a larger photo of this project. Take a light green 12 x 12” sheet from the Sea Breeze Collection paper. Cut it to have a 10 x 10” square paper. Lightly distress the edge with a tool designed for this purpose or simply use the blade of a scissor. Add gesso randomly and non-accurately all around your paper using a spatula. With a dots stencil, add a little bit of modeling paste to give dimension to your background. Glue this paper on a 12 x 12” beige paper from the same collection.
Diecut lace border from the paper collection and glue it under your green paper on the left side and another small piece on the right side.
Stamp the Oakberry lane blossom flowers with the fern green archival ink on red and orange paper from the sea breeze collection. You can color the petals a little bit with a dauber and the fern green ink. Cut it with the coordinating die. Shape the flowers by using the 3D Shaping Mold and give further shape with Deluxe Flower Shaping Kit tools. Add stamens in the center of the flowers.  
Use the Ticket and Tags die to make two beautiful tags. Put ribbon on them. Take 2 pieces of a sheet from an old book. Glue it on you layout and the 2 tags under it.  Put cheesecloth in the center of this and glue your picture over it (with 3D foam square to give volume). Made a circle with wire and glue it over your picture. Paste next to your picture the flowers you just made, with ribbon, jute rope and seashell. 
Stamp a boat with the stamp from the sea breeze collection and cut it with the appropriate die. Color it with the watercolor pencils. Glue it through the flowers.
In the left corner, glue flowers, ribbon, jute rope. You can also add a flair. Stamp birds from the sea breeze collection stamp and cut with the appropriate die. Glue the birds next to the flair to add the final touch.