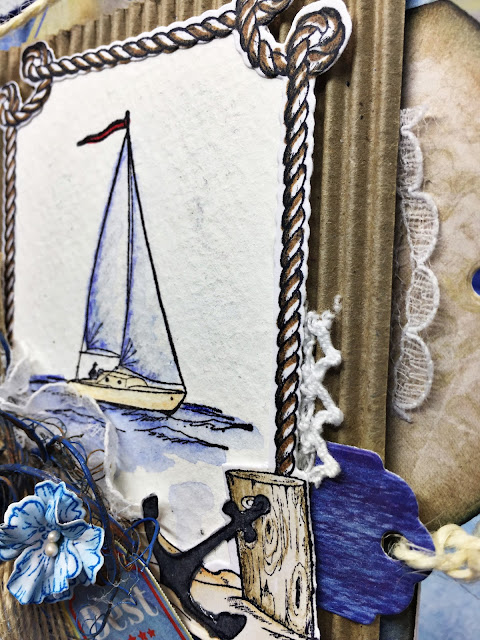
C'est le moment de vous présenter l'inspiration du mercredi de Heartfelt Creations ! Cette semaine je vous propose un petit tag aux allures marines. Pour se faire j'ai principalement utilisé la collection de papier et d'étampe de la collection Sea Breeze. Les fleurs elles sont pour leur part faites à la main avec les produits de la série oakberry Lane. J'aime vraiment beaucoup ces fleurs qui sont très versatiles et se prêtent à beaucoup de style différents !
J'ai pris soin de rajouter de la jute, des racines de bois, du papier kraft ondulé, de la dentelle afin de donner un look ou les matières premières sont à l'honneur.
Voici maintenant les produits que j'ai utilisés ainsi que les étapes de créations de mon tag.
Products Used:
Designer Dries White Adhesive, 159951
Scor-Pal Measuring & Scoring Board, 173842
Spellbinders Tool N' One, 359848
Scor-Tool, 368771
Stamp Mat Pad, D110305
Double Dots 100pc. -3D Foam Circles, DDOTS
Oakberry Lane Blossoms Die, HCD1-7200
Ticket and Tags Die, HCD1-7201
Album Tags and Accents Die, HCD1-7202
Ornamental Tags Die, HCD1-7203
A Day at Sea Die, HCD1-7266
Stack and Store Daubers-Pack of 30, HCDA2-450
Sea Breeze Paper Collection, HCDP1-2107
3D Blossoms Shaping Mold, HCFB1-469
Oakberry Lane Blossoms Cling Stamp Set, HCPC-3842
A Day at Sea Cling Stamp Set, HCPC-3892
Deluxe Flower Shaping Paper Pack of 25 - White, HCPP1-468
Pastel Bead Stamens-Medium, HCS1-457-3
Other Products: Die cutting machine, cheesecloth, thread, water mister, hot glue gun, hot glue, scissors, Prima lace, seashell, ribbon, watercolor pencils staedtler, 13 arts roots, distress ink walnut stain, Strathmore watercolor paper, Funnel Tray
For more tips on creating with the Sea Breeze Collection watch the tutorial at https://youtu.be/FEQMFvu880o.
For more tips on creating with the Oakberry Lane collection, watch the tutorial at https://youtu.be/HirfUN8NEYY.
Instructions: Tag size is 6 x 4". From the Sea Breeze paper Collection, die cut a tag with the Album Tag and Accents Die using the large tag (in a blue paper). Ink the edges with maganese blue ink. Cut a smaller piece of corrugated paperand glue on your tag base with 3D foam to give dimension.
Stamp a rope frame from the A day at sea stamp set on white cardstock paper and color it with pencil or markers. Die cut with the appropriate die. Stamp a boat on watercolor paper and color it with watercolor pencil. Glue the rope frame over it and glue it over the corrugated paper.
Stamp the Oakberry lane blossoms flowers with a blue archival ink on white card stock. Color the petals with the same color. Cut it with the coordinating die. Shape the flowers by using the 3D Shaping Mold and give further shape with Deluxe Flower Shaping Kit tools. Add stamens in the centre of the flowers.
Put a ribbon, roots and thread in the left corner of your tag and glue 3 flowers over it.
Cut 1 tag from the paper collection and add it to your layout. You can also cut two other ones in a beige paper (ink the edge with walnut stain ink) and a small one in a blue a blue paper and glue it under the currugated paper. Add thread, lace and ribbon in the holes of your tags to complete it.
If you want, you can take a 12 x 4” white cardstock and fold it in 2 to have a card. Take you tag die and put the left side of it outside the paper, because you don’t want the left side to be cut. Put it in the die cutting machine and you will have a card the same size as your tag. Then you just have to glue your tag on it to have a beautiful card.


Aucun commentaire:
Publier un commentaire